• Skip to primary navigation
  • Skip to main content
  • Skip to primary sidebar

Make Healthier Choices

Helping people Make Healthier Choices about real-food choices for optimal heath.

SEARCH

  • Home
  • Welcome
  • Free Body Scan
  • My Metabolic Meals
    • My Favorite Metabolic Meals
  • Recipes
    • Beverages
      • Audrey’s Pine Needle Tea
    • Bread
    • Candy
    • Desserts
    • DIY Recipes
      • DIY – Body
      • DIY – Household
      • DIY – Pets
      • Essential OIls
    • Fermented Foods
    • Free Recipes
    • Fruits
    • Main Dishes
      • Katherine’s White Chicken Chili
    • Meats
    • Pet Recipes
    • Salads
    • Sauces
    • Side Dishes
    • Snacks
    • Soup
      • Thai Soup – Immune-Building Soup
    • Spices
    • Vegetables
  • Recipes by Category
    • Gluten-Free
  • Blog
    • Articles
    • Ingredients & Substitutions
    • Reviews
  • About
    • Affiliate Disclosure
    • Contact me
    • Disclaimer
    • How I Overcame Sickness
  • The FUN Stuff
    • Sweepstakes
    • Take a Quiz
    • Free e-Books
  • Save on My Favorite Products
  • V Info

Beverages

Audrey’s Pine Needle Tea

March 12, 2022 By Recipe Renegade Leave a Comment

Share

UPDATE: I didn’t get to know Audrey too well, because I only met her twice. In those brief visits, it was obvious to me that she was one of the kindest people I had ever met. Even though I didn’t know her well, I was saddened to learn that she passed away on April 14, 2024. Personally, I think that earth lost an angel that day.

My friend, Audrey Heath, not only shared her Pine Needle Tea recipe with me, she was kind enough to drop off her finished product for me to try. She definitely kicked it up a notch or three! I’ve made pine needle tea for many years, but found mine to be quite boring. You won’t find Audrey’s tea boring!

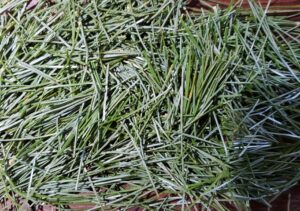
Use ONLY Eastern White Pine Needles!!!

There are lots of pine trees in North America, so please be CERTAIN that your tree is, in fact, an Eastern White Pine. Using the wrong needles, or drinking too much, could make you quite sick or could even be deadly. If you are unsure, find your county forester or contact your cooperative extension service to help you identify yours. Then check with your doctor before drinking!

You can find more information at Nature.org and Farmer’s Almanac. Found on nature.org: “Fun Fact: White pines are the only five-needle pines found east of the Rocky Mountains and get their common name from the number of needles in each pine: W-H-I-T-E!”

Does Suramin Come from Pine?

Somehow, a rumor started that Judy Mikovits said Suramin came from Pine. Do pine needles or Pine Needle Tea contain Suramin? Absolutely not! according to Judy Mikovits.  Suramin is a synthetic drug that doesn’t come from pine. Here’s exactly what she said:

“I didn’t say pine needles. I talked about a 100-year-old essential medicine, a synthetic drug made by Bayer-Monsanto, called suramin. And suramin is a synthetic drug, but it’s known to stop the expression of retroviruses, and viruses . . . Suramin does not come from pine needles, but there are terpenes. That’s a class of chemicals where we get turpentine that will stop a lot of toxins and pathogens, but it’s also very toxic.  . . . . ” ~~ Judy Mikovits

Hear What Judy Mikovits Said about Suramin (at 9:50 Minutes)


Audrey's Pine Needle Tea
 
Save Print
Please check with your doctor before drinking this tea.
Author: Audrey Heath
Recipe type: Tea
Ingredients
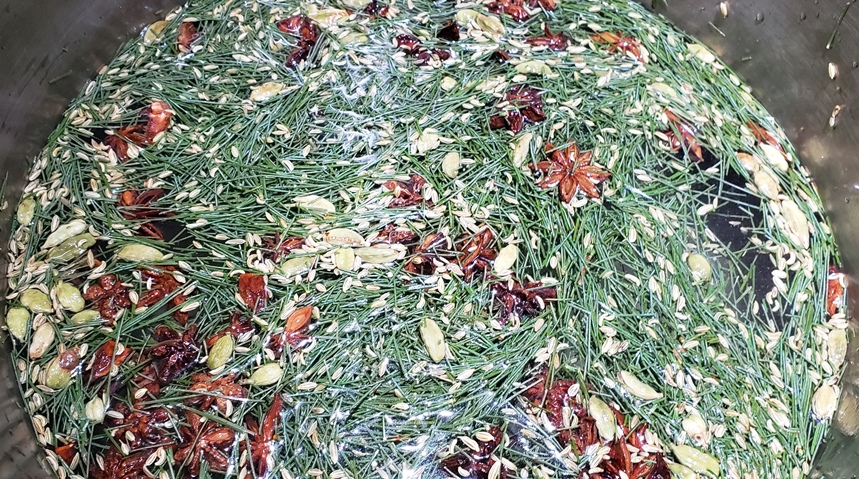
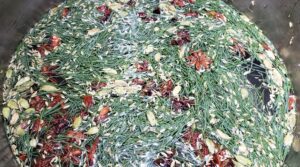
  • 2 Gallons of Clean Water
  • Large Coffee Can of Eastern Pine Tree Needles cut into 1" lengths.
  • 20 to 25 Star Anise
  • 2 Tablespoons Cardamom
  • 2 Tablespoons Fennel Seeds
Instructions
  1. Bring water to a boil, turn off.
  2. Add remaining ingredients and let sit for 20 minutes.
  3. Re-heat and simmer for 20 minutes.
  4. Cool, strain, bottle, and refrigerate.
  5. Make certain you strain; you don't want to swallow any pine needles!
3.5.3251

Remember that boiling releases the terpenes and over 116° kills the Vitamin C. 160° causes Vitamin C to explode. If you are interested in keeping the Vitamin C in tact, bring the water to a boil, let it cool to 115°, and then add the ingredients and let steep.

DO NOT DRINK THIS TEA WITHOUT FIRST CHECKING WITH YOUR DOCTOR!!! 

Cut Eastern Pine needles.

If you have a chance, look up what benefits might be found in star anise, cardamom, and fennel.

Statements on this page and website have not been evaluated by the FDA and are NOT intended to diagnose, prescribe, treat, prevent or cure any disease, condition, illness, or injury. Please do not use any information on this website in place of a doctor. Please consult a doctor before making ANY dietary changes.

Share

Filed Under: Beverages, Recipes Tagged With: cardamom, fennel, Judy Mikovits suramin, Pine Needle Tea, star anise

Old-Fashioned Eggnog

December 9, 2015 By Recipe Renegade Leave a Comment

Share

This eggnog is easy to make and delicious either warm or cold.

Gone are the days of making eggnog without cooking the eggs, like when I was a child. These days, eggs in most supermarkets are raised in CAFOs, in deplorable conditions rather than backyard chicken farmers. No worries about uncooked eggs with this recipe, since it is cooked to approximately 175°.

Although I’m not a fan of nutmeg, you might like to top yours with a bit of freshly-grated nutmeg or ground nutmeg.

Easy-To-Make Recipe

Old-Fashioned Eggnog
 
Save Print
This easy-to-make, cooked eggnog pairs well with both brandy and amaretto.
Author: Recipe Renegade
Ingredients
  • 2 or 3 Eggs
  • 3 to 5 Tablespoons Real Maple Syrup or Evaporated Cane Juice (sugar) (Sometimes I use half of each.)
  • 2½ Cups Raw Milk
  • Smidgen of Ancient Lakes Salt (my favorite), Himalayan Salt, or Celtic Salt
  • 1 Teaspoon Vanilla
  • OPTIONAL: Nutmeg or Cinnamon
Instructions
  1. Place eggs in saucepan and beat slightly.
  2. Add real maple syrup or evaporated cane juice.
  3. Add salt and stir.
  4. Stir in milk.
  5. Cook over medium heat, stirring constantly, to 175° (until mixture starts to coat a metal spoon).
  6. Remove from heat and stir in vanilla.
  7. Drink warm or cool eggnog by placing saucepan in cold water.
  8. Refrigerate 2 hours and consume within 24 hours.
  9. OPTIONAL: Garnish with nutmeg or cinnamon.
Notes
This recipe makes a very thick egg nog. If you don't like it too thick, just reduce your eggs accordingly.
3.5.3251

My Favorite Eggnog Spice

My favorite spice for this beverage is cinnamon. A splash of amaretto or brandy also goes quite nicely with this eggnog. Every holiday season I would  pour a glass and add rum, because I thought it was the correct alcohol for this drink. I always dumped out that first one because I never liked it, and poured another sans alcohol. When brandy was suggested I thought it was a huge improvement, but even better was amaretto!


Share

Filed Under: Beverages, Gluten-Free, Recipes

Kombucha Misinformation

November 5, 2015 By Recipe Renegade 2 Comments

Share

Sometimes it’s hard to differentiate between fact and fiction on the Internet. Especially when it comes to Kombucha. Kombucha myths are easy to find.

“I don’t drink Kombucha because of the sugar.”

A properly fermented, home-made Kombucha will have little to no sugar. I don’t like to ferment mine so long that there’s no sugar left. At some point I’ll purchase a test kit to know how much sugar is in my kombucha. Be careful of commercial brands that add sugar after fermenting. If you can’t stand the taste of no-sugar-added Kombucha, it’s not a bad idea to start out with one with sugar added to get used to drinking it. You can always graduate slowly to one without the sugar. Not everyone will want to drink something as tart as Kombucha. 

Glass of Kombucha Flowers with words Recipe Renegade

“There are no probiotics in Kombucha.”

Probiotics are live organisms, such as yeasts and bacteria, that promote life. “Pro” means “for” and “biotic” means “life,” so probiotic means “for life.” Kombucha can’t be made without a SCOBY, which stands for Symbiotic Colony of Bacteria and Yeast. A SCOBY is also known as a “mother,” “mushroom,” or “pancake.” To see if your store-bought Kombucha contains live cultures, try to grow your own SCOBY by putting some in a glass and leaving it on your counter for a week or so. You’ll see a film start to grow if it is alive.  Populating our guts with good yeasts and good bacteria promotes life.

A consensus definition of the term “probiotics,” based on the available information and scientific evidence, was adopted after a joint Food and Agricultural Organization of the United Nations and World Health Organization expert consultation. In October 2001, this expert consultation defined probiotics as: “live micro-organisms which, when administered in adequate amounts, confer a health benefit on the host.”

 “Kombucha isn’t good for us because tea contains lots of fluoride, so Kombucha has lots of fluoride in it”

Use organic tea and clean, un-fluoridated water to reduce fluoride. A small amount of naturally-occurring fluoride from the tea shouldn’t be an issue. There’s a big difference between a small amount of naturally-occurring fluoride and large amounts of man-made fluoride. Man-made fluoride is a byproduct of the fertilizer and aluminum industries.
It’s essential to always use clean water that does not contain fluoride, chlorine, or any other toxins, when making our own kombucha. Common sense tells us that we really shouldn’t be fermenting toxins.

Cultures for Health is one of my favorite places to buy fermenting supplies. You can find them HERE. Check out their article that puts some Kombucha myths to rest: Busting Kombucha Myths.

Share

Filed Under: Articles, Beverages, Blog, Fermented Foods, Recipes Tagged With: does kombucha have sugar? does kombucha have probiotics? what are probiotics, kombucha

Learn about Kombucha

August 6, 2015 By Recipe Renegade 3 Comments

Share

Learn about Kombucha Recipe Renegade

Kombucha is a delicious beverage made by fermenting sweet tea. It is acidic with a slight vinegar taste.  An Internet search yields a wealth of information regarding Kombucha, its origins and nutritional benefits. I like fermenting for food preservation, good bacteria (probiotics) and additional nutrients. Fermented foods are pre-digested and easier on our digestive systems.

Some companies add sugar after the Kombucha is fermented making it more palatable. I like to stay away from those brands and prefer making it myself.

Making Kombucha requires a culture called a SCOBY. SCOBY is an acronym for Symbiotic Colony of Bacteria and Yeast. The SCOBY, also known as “mother,” “mushroom,” or “pancake,” does the fermenting. Sugar feeds the SCOBY and should be eliminated, or at least almost eliminated, when the fermenting is complete. Once fermented, it will no longer taste like tea and there will be a new (second SCOBY) on top. Use the new SCOBY for the next batch and store the old SCOBY in a closed glass jar in the refrigerator for another batch, Kombucha Kandy, or give to a friend!

When this new SCOBY begins to form, it will make bubbles. These bubbles can easily be mistaken for mold. If mold does form, the entire batch needs to be thrown out. Be patient. Don’t be too quick to dispose of your first batch; wait and see if the “mold” turns into a SCOBY. I threw out my first batch of Kombucha mistaking the SCOBY bubbles for mold. If you think you have mold, ask an expert. If in doubt, yes, throw it out.

If you’re lucky enough to know someone who makes Kombucha, you might score a free SCOBY. It’s also possible to grow one with commercial Kombucha if it contains probiotics. Place it in a jar, cover with a paper towel, place rubber band around opening to keep out flies, etc., place on counter and wait. If all goes well and depending on weather, a new SCOBY will have formed in about 10 days. If a new one doesn’t grow, there are no live cultures or the conditions aren’t right.

Some people strain the brown yeast from their Kombucha. Unless there’s a large amount floating around, it doesn’t bother me. Even though that ugly brown stuff is yeast and not bacteria, it is beneficial for the gut. You can read more about good yeasts and probiotics here: Probiotics and Fermented Food

Please properly rinse and remove all detergent residues from any containers, utensils, etc. before using for Kombucha, as detergent can kill the SCOBY. Chlorine and honey can also kill the SCOBY since they have antibacterial properties. City water that contains chlorine will not work unless the chlorine is first removed. Keep in mind, anything that’s meant to kill bacteria can potentially kill the SCOBY.

While some metals are said to kill SCOBYs, I’ve found this isn’t true with stainless steel. Do NOT use any metal other than stainless steel! Nourishing Traditions says it’s even okay to store the SCOBY in stainless steel in the refrigerator, although I prefer glass. Mason jars work fine. NO PLASTIC!

My family drinks large amounts of Kombucha. At any time, I may have up to six, 2.15 gallon containers brewing—especially in the summer. ALWAYS USE A GLASS CONTAINER when fermenting! Make sure you use a container slightly larger than the amount of water called for in the recipe. If you don’t have a container large enough, and there’s a little sweet tea left, it’s okay to drink. Put some Kombucha aside for your next batch!

CAUTION: Never store in or drink Kombucha from plastic and NEVER shake it—it’s effervescent and can explode! When finished fermenting, store in refrigerator at 37°. NEVER eat or drink ANYTHING that does not taste right!!! Nourishing Traditions mentions some people may have an allergic reaction to Kombucha and advises if this happens, to use beet kvass for several weeks to detoxify before trying Kombucha again. If possible, purchase Nourishing Traditions cookbook; it’s a great book and well worth the price.

It’s a good idea to use pH strips to test if Kombucha is finished. Tasting can work, too. If it tastes sweet it’s probably not ready. Continue to test every 8 to 12 hours. When Kombucha is ready, bottle into glass bottles and tightly cap.

If you’re new to making Kombucha, you might want to purchase a starter kit like this one:

SUGAR: Organic white sugar or organic evaporated cane juice are the best sugar choices; the main job of the sugar is to feed the SCOBY. Do not use honey, rapadura, muscovado, etc. Always use organic.

FERMENTING NUMEROUS ITEMS: if you are fermenting numerous, different items like yogurt, kefir, sauerkraut, etc., make certain to keep several feet between them as the cultures can contaminate each other!

For more information about fermenting and Kombucha’s nutrients, go to this informative article by Sally Fallon Morell, the founding president of Weston A. Price Foundation, founder of A Campaign for Real Milk, and author (with Mary G. Enig. Ph.D.) of my favorite cookbook— Nourishing Traditions. http://www.westonaprice.org/health-topics/kvass-and-kombucha-gifts-from-russia

Click here for Kombucha Recipe


Share

Filed Under: Articles, Beverages, Blog Tagged With: how do I make kombuha?, how to ferment kombucha, how to store kombucha, kombucha do and don't, kombucha ph strips, learn about kombucha, new to kombucha, what kind of sugar do I use for kombucha?

Kombucha Batch Sizes

August 6, 2015 By Recipe Renegade 1 Comment

Share

Scroll down for batch sizes. Click here for recipe: How to Make Kombucha

Kombucha 2.15 Recipe Renegade copy

Don’t worry if all your sweet tea, Kombucha, and SCOBY don’t fit into the jar. It’s okay to drink the remaining sweet tea! “Kombucha from a previous culture” doesn’t have to be from home made, it can be from a commercial source.


1-Quart Kombucha

1 quart (32 oz.) filtered water
1/3 cup organic sugar
1 or 2 organic black tea bags
1/4 cup Kombucha from a previous culture
1 Kombucha SCOBY
1-liter glass container

3-Quarts Kombucha

3 quarts (96 oz.) filtered water
1 cup organic sugar
4 organic black tea bags
½ cup Kombucha from a previous culture1 Kombucha SCOBY
4-quart glass container

Double Batch (1 ½ gallons) Kombucha

6 quarts (192 oz.) filtered water
2 cups organic sugar
8 organic black tea bags
1 cup Kombucha from a previous culture
1 Kombucha SCOBY
7-quart (or larger) glass container

Two Gallons Kombucha

8 quarts (256 oz.) filtered water
2 2/3 cups organic sugar
11 organic black tea bags
1 1/3 cups Kombucha from a previous culture
1 Kombucha SCOBY
2.15 gallon glass container

Four Gallons Kombucha

16 quarts (4 gallons) filtered water
5 1/3 cups organic sugar
22 organic black tea bags
2 2/3 cups Kombucha from a previous culture
1 Kombucha SCOBY
Two 2.15 gallon glass containers

I buy my Newman’s Organic Black Tea at Swanson Vitamins or Amazon. Register for a new account at Swanson Vitamins and receive a free $5 coupon! Click here: Swanson Vitamins

Share

Filed Under: Beverages, Recipes

Chaga Tea

May 20, 2015 By Recipe Renegade Leave a Comment

Share


Chaga mushrooms are adaptogens. If you’ve never heard the term, adaptogens are plants that know what our bodies need. Dr. Fisher explains in the video below, “An adaptogen is a plant that will change a physiological value. Let’s take blood pressure. Suppose you have high blood pressure. By taking a certain adaptogen, it will lower your blood pressure. Let’s say you have low  blood pressure, hypotension. By taking that SAME adaptogen, it will elevate your blood pressure. . . By giving the body what it needs . . . the body can repair itself and the body can function optimally. . . ” How cool is that?

My favorite way to ingest chaga is to make chaga tea (never eat it raw!) and add it, 50/50, to organic black coffee. (I use Vermont Coffee Company’s Decaf.) I especially love to add equal amounts of Chaga and coffee into my Vitamix along with a tablespoon of organic coconut oil  and a tablespoon of organic grass-fed butter, then blend until frothy – YUM!

Chaga Tea
 
Save Print
Author: Recipe Renegade
Ingredients
  • 1 oz. dried and chunked Chaga Mushroom (about ½ cup)
  • 32 oz. filtered water
Instructions
  1. Place water and Chaga into a stainless steel or glass pot and measure height.
  2. Bring to a slow boil.
  3. Boil until water has evaporated by ⅓.
  4. When done, Chaga Tea will look like a rich, dark coffee.

  5. Each day, remove the amount of Chaga tea you'd like to drink and replace with fresh water to the boiled-down level. (If you remove 4 oz. of tea, replace with 4 oz. water.)
  6. Bring to a slow boil and boil for about 10 - 15 minutes.
  7. Chaga MUST be boiled each day to prevent mold. If mold occurs - THROW OUT!!!
3.5.3208

When I first purchased chaga, a Master Herbalist told me,  “chaga will let you know when its not useful anymore.”  She was right. When finished, the liquid turns almost clear and the chaga is visible at the bottom of the pot. The remaining chaga chunks can be made into a Chaga tincture. More on that later.

My chaga tea sits on my stovetop in a glass pot waiting for me. (CAUTION: The chaga discolored my glass pot.) Each day I remove about 8 to 16 oz. and replace with fresh water. I bring it to a soft boil for about 10 to 12 minutes. IT MUST BE BOILED EACH DAY TO AVOID MOLD!!!

If you’d like to know how to purchase chaga at an exceptional price, please fill out the contact form below and hit “submit.”

Thank you.
Security Code:
security code
Please enter the security code:
Please enter a valid captcha code.

Submit


Watch this video to learn more about adaptogens:


Liquid Nutritionals Photo
Click picture to learn about another adaptogen–moringa oleifera. Email me for information on purchasing at wholesale prices.


Share

Filed Under: Beverages, Gluten-Free, Recipes Tagged With: Chaga tea, how to make chaga tea, mushrooms, what is an adaptogen, what is chaga tea, what is chaga? mushrooms adaptogen

Next Page »

Primary Sidebar

Search

Click for more information.

Follow me on:

Please be advised:

Statements on this website have not been evaluated by the FDA and are NOT intended to diagnose, prescribe, treat, prevent or cure any disease, condition, illness, or injury. Please do not use any information on this website in place of a doctor. Please consult a doctor before making ANY dietary changes.

AFFILIATE DISCLOSURE:

AFFILIATE DISCLOSURE: Throughout this website, you will find affiliate links. Any links you click on may or may not provide remuneration to help me support this website. Please note that any reviews will be honest reviews regardless of monetary compensation. Make Healthier Choices is a participant in the Amazon Services LLC Associates Program, an affiliate advertising program designed to provide a means for sites to earn advertising fees by advertising and linking to Amazon.com. Please be advised that Lynn McGovern, d/b/a Make Healthier Choices, is an Independent Zija International Distributor which includes Améo Essential Oils and Ripstix Supplements.

My Favorite Kitchen Appliance

I use this air fryer every day. I can not only air fry, I can bake, toast, defrost and much, much more.

Archives

  • March 2025
  • January 2025
  • December 2022
  • October 2022
  • August 2022
  • March 2022
  • September 2021
  • May 2021
  • November 2020
  • January 2020
  • January 2018
  • March 2017
  • February 2017
  • August 2016
  • May 2016
  • April 2016
  • March 2016
  • February 2016
  • January 2016
  • December 2015
  • November 2015
  • October 2015
  • September 2015
  • August 2015
  • July 2015
  • June 2015
  • May 2015
  • Welcome
  • Recipes
  • About Lynn
  • Ingredients & Substitutions
  • Affiliate Disclosure
  • Articles

Copyright © 2025 · Make Healthier Choices · Log in