• Skip to primary navigation
  • Skip to main content
  • Skip to primary sidebar

Make Healthier Choices

Helping people Make Healthier Choices about real-food choices for optimal heath.

SEARCH

  • Home
  • Welcome
  • Free Body Scan
  • My Metabolic Meals
    • My Favorite Metabolic Meals
  • Recipes
    • Beverages
      • Audrey’s Pine Needle Tea
    • Bread
    • Candy
    • Desserts
    • DIY Recipes
      • DIY – Body
      • DIY – Household
      • DIY – Pets
      • Essential OIls
    • Fermented Foods
    • Free Recipes
    • Fruits
    • Main Dishes
      • Katherine’s White Chicken Chili
    • Meats
    • Pet Recipes
    • Salads
    • Sauces
    • Side Dishes
    • Snacks
    • Soup
      • Thai Soup – Immune-Building Soup
    • Spices
    • Vegetables
  • Recipes by Category
    • Gluten-Free
  • Blog
    • Articles
    • Ingredients & Substitutions
    • Reviews
  • About
    • Affiliate Disclosure
    • Contact me
    • Disclaimer
    • How I Overcame Sickness
  • The FUN Stuff
    • Sweepstakes
    • Take a Quiz
    • Free e-Books
  • Save on My Favorite Products
  • V Info

Gluten-Free

Quick and Easy Macaroons

March 7, 2017 By Recipe Renegade Leave a Comment

Share

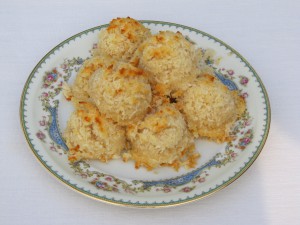
3-Ingredient Macaroons

When I’m craving something sweet, or when I have leftover egg whites from making Hollandaise sauce I usually make these macaroons. These gluten-free macaroons can are made with only three ingredients–the vanilla and Himalayan salt are optional.

Macaroons RecipeRenegade


Macaroons
 
Save Print
Prep time
4 mins
Cook time
15 mins
Total time
19 mins
 
These delicious macaroons are quick and easy to make.
Author: Recipe Renegade
Serves: 15
Ingredients
  • 5 Egg Whites
  • ½ Cup Maple Syrup
  • One 8 oz. Bag of Shredded/Unsweetened Coconut
    OPTIONAL:
  • 2 Teaspoons Vanilla Extract
  • ½ Teaspoon Himalayan Salt
Instructions
  1. Pre-heat oven to 350° F
  2. Place all ingredients in bowl.
  3. Mix until well blended.
  4. Drop onto cookie sheet using small, old-fashioned ice cream scoop.
  5. Bake at 350° for 15 minutes or until tops are lightly browned.
Notes
To keep macaroons from being sticky on the bottom, flatten before baking; flip after baking 15 minutes and cook for another couple minutes.
3.5.3208


Share

Filed Under: Desserts, Gluten-Free, Recipes Tagged With: baking with coconut, coconut, coconut macaroons, how to use coconut, Macaroons, no honey macaroons

Easy Cauliflower Pizza Crust

March 31, 2016 By Recipe Renegade 3 Comments

Share

Gluten-Free Cauliflower Pizza Crust

Cauliflower Crust Recipe Renegade

Cauliflower Pizza Crust – the Hard Way

The first time I made cauliflower pizza crust, it took me FOREVER! All my counters were covered with dirty dishes–what a mess! It was a LOT of work, but I’ll admit–it was delicious!

I won’t eat any supermarket vegetables that haven’t first been washed. So after washing the cauliflower: I steamed it on the stove top, cooled it, pulverized it in my food processor, emptied it into a dish/tea towel, squeezed the heck out of it, put it in a bowl, mixed in other ingredients, spread it onto a pan, baked it, flipped it, baked it again, then made it into pizza and baked it again. Aren’t you tired just reading about it???

Skip the Tough Steps

Being able to skip the squeeze-the-heck-out-of-it step, pulverizing in the food processor, and baking instead of steaming all helped save me a LOT of time. Not only are steps skipped, but not having to wash extra pots/pans, etc. saved time. And I have to admit I hated all that nutritious juice going down the drain. If you enjoy a gluten-free lifestyle, but have not yet tried cauliflower pizza crust trust me, it’s worth it! But try it the easier way . . . use a juicer.

Cauliflower Pizza Crust – the Easier Way

If you have a juicer, you’ll find this pizza crust easy to make. I have an Omega NC800HDS (you can see it in action on my You Tube channel), but any juicer will work. Cauliflower juice isn’t exactly my favorite, but you’ll probably want to save the juice. I usually juice a couple of carrots and an apple to go with a small amount of cauliflower juice.

Easy Cauliflower Pizza
 
Save Print
Author: Recipe Renegade
Ingredients
  • For the Crust:
  • 1 Head of Cauliflower
  • 2 Eggs
  • 1 Teaspoon Italian Seasoning
Instructions
  1. Pre-heat oven to 425° F
  2. Remove cauliflower core, cut florets off stem and wash.
  3. Juice cauliflower; set juice aside to drink later.
  4. Place pulp on jelly pan (or cookie sheet).
  5. Bake pulp for 12 minutes.
  6. Remove pulp and let cool for about 5 minutes.
    While cauliflower is cooling:
  7. Place eggs in medium-sized bowl and slightly beat.
  8. Add Italian seasoning.
  9. Once cauliflower pulp has cooled to touch, add to bowl; mix together.
  10. Spread mixture onto silicone-lined jelly pan (or parchment-paper lined jelly pan).
  11. Bake at 425° for 8 minutes.
  12. Flip (I do this by placing silicone mat (or parchment paper) and second jelly pan on top and CAREFULLY and quickly flipping.)
  13. Bake for additional 8 minutes.

    Go here for: Cauliflower Pizza
Notes
Cheese is one of the ingredients in the first recipe I tried. I don't personally use cheese in my crust; I think cheese makes the crust tend to stick to the parchment paper/silicone liner making it easier to flip.
3.5.3208

These crusts freeze nicely. I’ve even frozen the pulp in a vacuum-seal bag. I like to make make it worth dirtying my juicer, so I make three or four at a time and freeze them. I roll mine in waxed paper (parchment paper would also work) and place into a (2.5 gallon) extra-large plastic bag. I allow them to thaw before flattening onto a jelly pan.

Cauliflower Mushroom Pizza MHC RR


Share

Filed Under: Gluten-Free, Main Dishes, Recipes, Snacks Tagged With: gluten free pizza crust, how to make cauliflower pizza crust, pizza crust

Cauliflower Pizza

March 31, 2016 By Recipe Renegade 1 Comment

Share

Gluten-Free Cauliflower Pizza

Cauliflower Mushroom Pizza MHC RR


Cauliflower Pizza
 
Save Print
Author: Recipe Renegade
Ingredients
  • One Cauliflower Pizza Crust
  • 15 Oz. of Your favorite Tomato Sauce
  • ¾ to 1½ Cups Shredded Cheddar Cheese
  • ¾ to 1½ Cups Shredded Mozarella Cheese
  • Your Favorite Pizza Toppings
Instructions
  1. Top Cauliflower Pizza Crust with tomato sauce, cheese and your favorite toppings.
  2. Bake on jelly pan at 450° F for 10 minutes or until cheese is melted.
Notes
I topped my pizza with diced onions, pre-cooked sliced mushrooms and basil. It was delicious!
3.5.3208

Find my Cauliflower Pizza Crust here:

Cauliflower Pizza Crust


Share

Filed Under: Gluten-Free, Main Dishes, Snacks Tagged With: Cauliflower Pizza, how to make cauliflour pizza crust, How to make cauliflower Pizza

Homemade Toothpaste – Secret to the Right Consistency

January 29, 2016 By Recipe Renegade 3 Comments

Share

No More Plaque

Ralph Nadar exposed the Dirty Dozen in Cancer Prevention News, in the Fall 1995 issue. The toothpaste I used at the time, Crest Tartar Control, happened to be on that list. I quickly moved to better, more trusted toothpastes. I have only used homemade toothpaste for a few years. I’m glad I switched!

I’ll admit my surprise when my dental hygienist said, “you no longer have plaque on your teeth.” She also said, “you only have stain from drinking coffee or tea.” Then she asked, “Are you using baking soda?” I actually thought to myself, hmmm…it must be well-known at least in the dental community, that baking soda removes plaque, and Wow, if I gave up coffee, tea, and any stain-causing drinks, what would she do during my appointment?


Too Sloppy or Too Hard?

If you’ve ever made your own toothpaste, you know it’s usually too sloppy in the summer and too hard in the winter. I had to experiment to keep my toothpaste softer in the winter and more solid in the summer. Coconut oil is solid at 76° and stays liquid above that temperature.  Coconut oil and orange essential oil are both known teeth whiteners.

The Right Consistency

My secrets to keeping the right consistency:  In winter, I add fractionated coconut oil (FCO) or MOM (Milk of Magnesia) In the summer, I omit the FCO and add more baking soda. I keep adding baking soda until it’s the consistency I want. To make adjustments in temperatures under 76°, it needs to be heated until melted or added to a food processor (I use this mini-processor). I sometimes use a bigger processor to make more at once. Since we all keep our homes at different temperatures, we’ll all use different amounts of FCO and baking soda. Start with my basic recipe and go from there—adding either more FCO, MOM, or more baking soda.

Each Family Member Should Have Their Own Jar

You’ll need to dip your toothbrush into the jar. Please give each family member a jar of their own toothpaste. It’s not a good idea to spit this toothpaste out into your sink. CAUTION: Coconut oil is great at clogging drains. I always use organic coconut oil as my base, but for making do-it-yourself recipes like this one, I sometimes use the lesser expensive, organic refined coconut oil.


UPDATE

UPDATE: At my most recent cleaning appointment in March 2016, I again asked if I had any plaque. My hygienist said, “No, only stain from coffee.” She suggested I use a whitening mouth rinse and then added “they contain hydrogen peroxide.” Of course, I  won’t use chemical-laden mouth washes. I typically had a cavity every one to two years, but I’ve not had a cavity in the six years I’ve been drinking Zija International’s Supermix which is primarily moringa oleifera (a plant). Zija International was the company that brought moringa to the United States in an enzymatically alive, bioavailable, easy-to-re-hydrate packet. Zija has since been purchased by Isagenix. You can find it here: Isagenix Zija Supermix.

Please note: This is my experience; you might not have the same results.


Share

Filed Under: DIY - Body, DIY Recipes, Gluten-Free Tagged With: how to keep home made toothpaste from being too mushy, how to keep homemade toothpaste from being too hard, how to make home made toothpaste, how to make home made toothpaste so it is not runny, how to make homemade toothpaste, toothpaste, X how to keep homemade toothpaste from being too runny soft

Old-Fashioned Eggnog

December 9, 2015 By Recipe Renegade Leave a Comment

Share

This eggnog is easy to make and delicious either warm or cold.

Gone are the days of making eggnog without cooking the eggs, like when I was a child. These days, eggs in most supermarkets are raised in CAFOs, in deplorable conditions rather than backyard chicken farmers. No worries about uncooked eggs with this recipe, since it is cooked to approximately 175°.

Although I’m not a fan of nutmeg, you might like to top yours with a bit of freshly-grated nutmeg or ground nutmeg.

Easy-To-Make Recipe

Old-Fashioned Eggnog
 
Save Print
This easy-to-make, cooked eggnog pairs well with both brandy and amaretto.
Author: Recipe Renegade
Ingredients
  • 2 or 3 Eggs
  • 3 to 5 Tablespoons Real Maple Syrup or Evaporated Cane Juice (sugar) (Sometimes I use half of each.)
  • 2½ Cups Raw Milk
  • Smidgen of Ancient Lakes Salt (my favorite), Himalayan Salt, or Celtic Salt
  • 1 Teaspoon Vanilla
  • OPTIONAL: Nutmeg or Cinnamon
Instructions
  1. Place eggs in saucepan and beat slightly.
  2. Add real maple syrup or evaporated cane juice.
  3. Add salt and stir.
  4. Stir in milk.
  5. Cook over medium heat, stirring constantly, to 175° (until mixture starts to coat a metal spoon).
  6. Remove from heat and stir in vanilla.
  7. Drink warm or cool eggnog by placing saucepan in cold water.
  8. Refrigerate 2 hours and consume within 24 hours.
  9. OPTIONAL: Garnish with nutmeg or cinnamon.
Notes
This recipe makes a very thick egg nog. If you don't like it too thick, just reduce your eggs accordingly.
3.5.3251

My Favorite Eggnog Spice

My favorite spice for this beverage is cinnamon. A splash of amaretto or brandy also goes quite nicely with this eggnog. Every holiday season I would  pour a glass and add rum, because I thought it was the correct alcohol for this drink. I always dumped out that first one because I never liked it, and poured another sans alcohol. When brandy was suggested I thought it was a huge improvement, but even better was amaretto!


Share

Filed Under: Beverages, Gluten-Free, Recipes

Easy Way to Cook Winter Squash – No Peeler Required

November 23, 2015 By Recipe Renegade Leave a Comment

Share

Butternut Squash Recipe Renegade

I can’t count how many times  peeled winter squash before cooking. It seems once I invested in an expensive, sharp vegetable peeler, I then realized peeling wasn’t necessary. Go figure. I like to cook several at a time and freeze in vacuum-seal bags. I make my own bags by using these rolls:

STEAMED:
Easy Way to Steam Winter Squash - No Peeler Required
 
Save Print
Steamed butternut squash
Author: Recipe Renegade
Ingredients
  • Butternut (or other winter squash) Squash
  • 2 Tablespoons Melted Butter
  • 2 Tablespoons Maple Syrup (+-)
  • ¼ Teaspoon Himalayan Salt (+/-)
Instructions
  1. Carefully and with a sharp chef knife, cut off both ends of squash.
  2. Stand squash up on one end.
  3. Cut in half (lengthwise).
  4. Seeds and pulp can be removed now or after cooking.
  5. Put on cutting board, cut side down, and cut into a couple smaller pieces.
  6. Put into steamer basket and steam for about 35 minutes or until squash is soft.
  7. Remove from steamer and place on cutting board to cool.
  8. If seeds were not removed before cooking, carefully remove them.
  9. Once squash has cooled (about ½ hour depending on thickness of squash), scoop squash out into a mixing bowl.
  10. Add butter, salt, and maple syrup.
  11. Use electric mixer to blend.
  12. Re-heat before serving.
3.5.3208

BAKED:
Easy Way to Bake Winter Squash - No Peeler Required
 
Save Print
Baked in Oven
Author: Recipe Renegade
Ingredients
  • 1 Butternut (or other winter squash) Squash
  • ¾ Cup Water
  • 2 Tablespoons Melted Butter
  • 2 Tablespoons Maple Syrup (+-)
  • ¼ Teaspoon Himalayan Salt (+/-)
Instructions
  1. Carefully and with a sharp chef knife, cut off both ends of squash.
  2. Stand squash up on one end.
  3. Cut in half (lengthwise).
  4. Seeds and pulp can be removed now or after cooking.
  5. Place on jelly pan, skin side up.
  6. Add water to pan.
  7. Bake at 400° F for about 35 minutes or until squash is soft.
  8. Remove and place on cutting board or cooling rack to cool.
  9. If seeds were not removed before cooking, carefully remove them.
  10. Once squash has cooled (about ½ hour depending on thickness of squash), scoop squash out into a mixing bowl.
  11. Add butter, salt, and maple syrup.
  12. Use electric mixer to blend.
  13. Re-heat before serving.
3.5.3208

Share

Filed Under: Fruits, Gluten-Free, Recipes, Side Dishes, Vegetables Tagged With: Easy way to cook butternut squash, how to cook squash, how to cook winter squash

Next Page »

Primary Sidebar

Search

My Metabolic Meals

Delicious and stress-free meals that are: 100% Gluten-free, and contain no artificial flavors, dyes, MSG, soy, wheat, rye, barley, malt, triticale, brewer’s yeast, low-grade proteins, and no processed vegetable oils (like canola, cottonseed, soybean, safflower). They also use grass-fed, grass-finished meats, and wild-caught seafood!!

Check out my Fullscript store!

Follow me on:

Please be advised:

Statements on this website have not been evaluated by the FDA and are NOT intended to diagnose, prescribe, treat, prevent or cure any disease, condition, illness, or injury. Please do not use any information on this website in place of a doctor. Please consult a doctor before making ANY dietary changes. This website is presented for entertainment purposes only.

AFFILIATE DISCLOSURE:

AFFILIATE DISCLOSURE: Throughout this website, you will find affiliate links. Any links you follow may or may not provide remuneration to help me support this website. Please note that any reviews will be honest reviews regardless of monetary compensation. Make Healthier Choices is a participant in the Amazon Services LLC Associates Program, an affiliate advertising program designed to provide a means for sites to earn advertising fees by advertising and linking to Amazon.com.

My Favorite Kitchen Appliance

I use this air fryer every day. I can not only air fry, I can bake, toast, defrost and much, much more.

Archives

  • May 2025
  • March 2025
  • January 2025
  • December 2022
  • October 2022
  • August 2022
  • March 2022
  • September 2021
  • May 2021
  • November 2020
  • January 2020
  • January 2018
  • March 2017
  • February 2017
  • August 2016
  • May 2016
  • April 2016
  • March 2016
  • February 2016
  • January 2016
  • December 2015
  • November 2015
  • October 2015
  • September 2015
  • August 2015
  • July 2015
  • June 2015
  • May 2015
  • Welcome
  • Recipes
  • About Lynn
  • Ingredients & Substitutions
  • Affiliate Disclosure
  • Articles

Copyright © 2025 · Make Healthier Choices · Log in