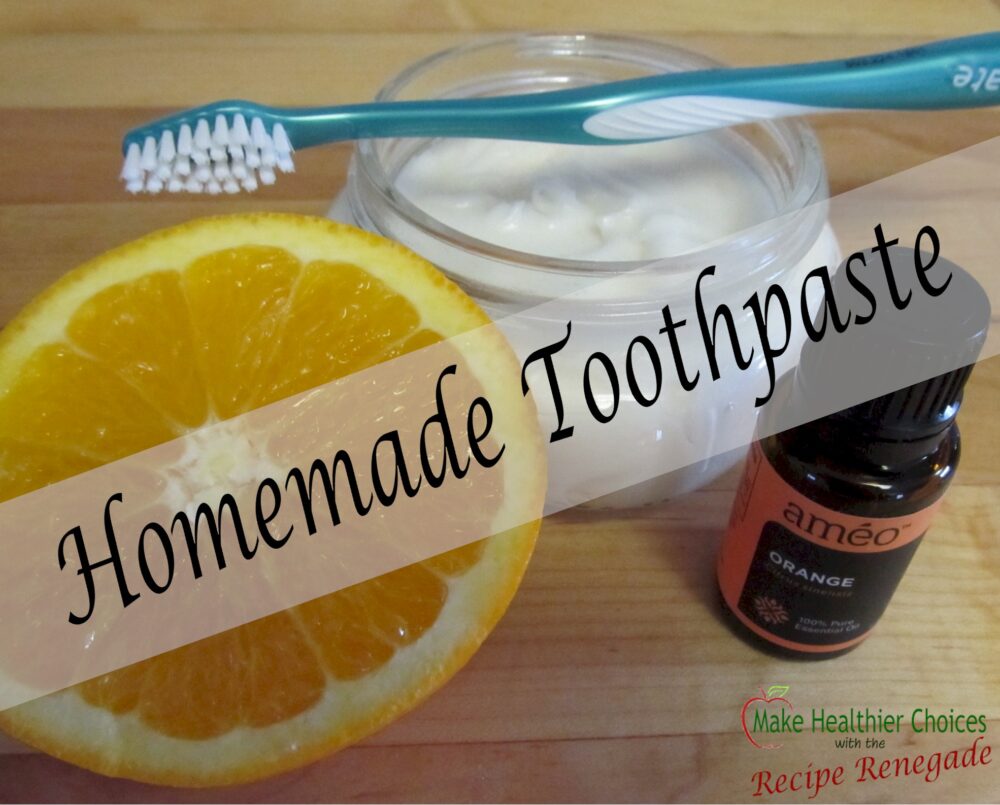
• Skip to primary navigation
  • Skip to main content
  • Skip to primary sidebar

Make Healthier Choices

Helping people Make Healthier Choices about real-food choices for optimal heath.

SEARCH

  • Home
  • Welcome
  • Free Body Scan
  • My Metabolic Meals
    • My Favorite Metabolic Meals
  • Recipes
    • Beverages
      • Audrey’s Pine Needle Tea
    • Bread
    • Candy
    • Desserts
    • DIY Recipes
      • DIY – Body
      • DIY – Household
      • DIY – Pets
      • Essential OIls
    • Fermented Foods
    • Free Recipes
    • Fruits
    • Main Dishes
      • Katherine’s White Chicken Chili
    • Meats
    • Pet Recipes
    • Salads
    • Sauces
    • Side Dishes
    • Snacks
    • Soup
      • Thai Soup – Immune-Building Soup
    • Spices
    • Vegetables
  • Recipes by Category
    • Gluten-Free
  • Blog
    • Articles
    • Ingredients & Substitutions
    • Reviews
  • About
    • Affiliate Disclosure
    • Contact me
    • Disclaimer
    • How I Overcame Sickness
  • The FUN Stuff
    • Sweepstakes
    • Take a Quiz
    • Free e-Books
  • Save on My Favorite Products
  • V Info

DIY Recipes

Homemade Toothpaste – Secret to the Right Consistency

January 29, 2016 By Recipe Renegade 3 Comments

Share

No More Plaque

Ralph Nadar exposed the Dirty Dozen in Cancer Prevention News, in the Fall 1995 issue. The toothpaste I used at the time, Crest Tartar Control, happened to be on that list. I quickly moved to better, more trusted toothpastes. I have only used homemade toothpaste for a few years. I’m glad I switched!

I’ll admit my surprise when my dental hygienist said, “you no longer have plaque on your teeth.” She also said, “you only have stain from drinking coffee or tea.” Then she asked, “Are you using baking soda?” I actually thought to myself, hmmm…it must be well-known at least in the dental community, that baking soda removes plaque, and Wow, if I gave up coffee, tea, and any stain-causing drinks, what would she do during my appointment?


Too Sloppy or Too Hard?

If you’ve ever made your own toothpaste, you know it’s usually too sloppy in the summer and too hard in the winter. I had to experiment to keep my toothpaste softer in the winter and more solid in the summer. Coconut oil is solid at 76° and stays liquid above that temperature.  Coconut oil and orange essential oil are both known teeth whiteners.

The Right Consistency

My secrets to keeping the right consistency:  In winter, I add fractionated coconut oil (FCO) or MOM (Milk of Magnesia) In the summer, I omit the FCO and add more baking soda. I keep adding baking soda until it’s the consistency I want. To make adjustments in temperatures under 76°, it needs to be heated until melted or added to a food processor (I use this mini-processor). I sometimes use a bigger processor to make more at once. Since we all keep our homes at different temperatures, we’ll all use different amounts of FCO and baking soda. Start with my basic recipe and go from there—adding either more FCO, MOM, or more baking soda.

Each Family Member Should Have Their Own Jar

You’ll need to dip your toothbrush into the jar. Please give each family member a jar of their own toothpaste. It’s not a good idea to spit this toothpaste out into your sink. CAUTION: Coconut oil is great at clogging drains. I always use organic coconut oil as my base, but for making do-it-yourself recipes like this one, I sometimes use the lesser expensive, organic refined coconut oil.


UPDATE

UPDATE: At my most recent cleaning appointment in March 2016, I again asked if I had any plaque. My hygienist said, “No, only stain from coffee.” She suggested I use a whitening mouth rinse and then added “they contain hydrogen peroxide.” Of course, I  won’t use chemical-laden mouth washes. I typically had a cavity every one to two years, but I’ve not had a cavity in the six years I’ve been drinking Zija International’s Supermix which is primarily moringa oleifera (a plant). Zija International was the company that brought moringa to the United States in an enzymatically alive, bioavailable, easy-to-re-hydrate packet. Zija has since been purchased by Isagenix. You can find it here: Isagenix Zija Supermix.

Please note: This is my experience; you might not have the same results.


Share

Filed Under: DIY - Body, DIY Recipes, Gluten-Free Tagged With: how to keep home made toothpaste from being too mushy, how to keep homemade toothpaste from being too hard, how to make home made toothpaste, how to make home made toothpaste so it is not runny, how to make homemade toothpaste, toothpaste, X how to keep homemade toothpaste from being too runny soft

Pumpkin Dog Bones (Biscuits)

January 14, 2016 By Recipe Renegade Leave a Comment

Share

Rey-Rey’s Favorite Gluten-Free Dog Bones

Pumpkin Dog Bones Recipe Renegade

It would surprise me if your dog didn’t like these dog bones. My picky dog loves these nutritious treats. I feed nothing to my dog that I wouldn’t eat myself. Because I don’t eat propylene glycol, caramel color, or sodium nitrate—common ingredients found in many dog treats—I make my own. Weighing in at less than ten pounds, means I can afford to give her real food like: pumpkin; chicken; beef; carrots; green beans; sweet potatoes; valencia peanut butter; and Zija’s Supermix (moringa oleifera). I expect my veterinarian bills to be less, especially for her teeth. Dr. Weston Price traveled the world to learn what causes cavities; he found nutritional deficiencies to be the culprit (not bacteria).

All Real Food

These dog treats contain both nutritional yeast and brewer’s yeast. My father always gave our family dog brewer’s yeast to keep fleas away. I’ll assume it’s true, because I never saw one flea on that dog.

This recipe also contains garlic or onion powder. According to Dogs Naturally magazine, onions and garlic are okay in small amounts. In fact, a veterinarian told me the only real thing I need to worry about is Xylitol, which will quickly kill a dog. I’m also not so sure Xylitol is good for humans, either. Read more about Xylitol here: Xylitol.

Pumpkin Dog Bones
 
Save Print
Author: Recipe Renegade
Ingredients
  • 1 Cup
    Brown Rice Flour
  • 1 Cup Freshly Ground Oat Flour
  • ¾ Cup Freshly Ground Flaxseed
  • 2 Tablespoons Nutritional Yeast
  • 2 Tablespoons Brewer’s Yeast
  • ½ Teaspoon Garlic Powder or Onion Powder
  • 1 Teaspoon Parsley
  • 1 Teaspoon Baking Soda
  • 1 16-Ounce Package Pumpkin
  • 1 Slightly Beaten Egg
  • About ½ Cup Liquid--bone broth, apple juice, apple cider, or water. PLEASE NOTE: Liquid might not be needed depending on how much liquid is in the pumpkin.
Instructions
  1. Add all dry ingredients to mixing bowl (stand mixer works great)
  2. Mix thoroughly.
  3. Add pumpkin and egg.
  4. Mix.
  5. Add only enough liquid to make into a ball.
  6. Roll out onto floured pastry board.
  7. Use cookie cutter to cut into dog bones or cut into squares.
  8. Bake at 350° for 25 minutes.
  9. Flip bones over and bake for 25 more minutes.
  10. Reduce oven to 175° and bake for 6 to 8 hours or dry in a dehydrator overnight at 155° or until completely dry.
  11. Bake/dehydrate longer if necessary making certain bones are completely dry. (Moisture left in bones will cause them to spoil quicker.)
  12. Store in airtight container.
Notes
If you don't feel comfortable with the garlic or onion powder, it's okay to omit.
QUICKER-An even quicker way to make these is to roll out onto parchment paper and cut into small pieces after transferring paper/dough to jelly pan. It's not necessary to cut all the way through; they'll break apart easily.
3.5.3229

Please Be Sure To Properly Dehydrate

As with any dry dog treat, beware that they can be a choking hazard, especially if they are too large. Please give them small, bite-size pieces appropriate for your size dog.

Did you know you can get a dog bone cookie cutter with your dog’s name personalized on it? Personalized Dog Bone Cookie Cutter.

When I don’t have time to make these, I purchase made-in-New-Hampshire Casey Jones Bones. In my local area they sell for about $5.99/box.

Source: How To Detox Your Dog


Share

Filed Under: DIY - Pets, DIY Recipes, Pet Recipes, Recipes Tagged With: Dog bones, gluten free dog treats biscuits bnes, healthy dog bones biscuits, homemade dog treats, make your own dog treats, make your own healthy dog treats biscuits bones, pumpkin dog bones

How to Remove a Baked-On Mess

October 8, 2015 By Recipe Renegade Leave a Comment

Share

I wouldn’t have believed it if I hadn’t tried it myself. I purchased a vintage, glass bread pan at my local thrift store. It was a baked-on mess, but I convinced myself I had the necessary cleaning supplies to get it sparkling in no time. Well, with a little elbow grease, of course! It turned out it took lots of elbow grease to accomplish nothing. Even using a magic foam eraser and my stove-top cleaner, I hadn’t made much progress. This is what it still looked like:

Vintage bread pan dirty

What a waste of my time! Into the outgoing thrift-store box it went. A month or two went by, the box still sat there waiting for me to drop it off, and a friend stopped by. The conversation somehow moved to: getting baked-on crud off baking pans. She said she knew a way to get them clean. I immediately thought of my cute little bread pan and retrieved it. Here’s what she told me: put it in a plastic bag with a tablespoon of ammonia and let it sit overnight. I said, “Okay, what do I have to lose except a tablespoon of ammonia and a plastic bag?” I tried and honestly, a little bit came off, but there wasn’t a whole lot of improvement.

So I decided maybe I hadn’t left it in the bag for long enough. Maybe overnight wasn’t enough. I’d try it again and leave it longer. Again, I  put ammonia in the pan, the pan into a large zipper bag and placed it in my garage.

IMG_5725

Hiding in my garage, I actually forgot about it for a couple weeks. I took it out and I have to say, I was surprised. After washing, rinsing, and without any elbow grease, this is what it looked like:

Vintage Bread Pan

Thanks, Sue!

PLEASE be careful when using ammonia—it’s EXPLOSIVE! Please wear gloves, eye protection, and protect yourself from breathing it!

Share

Filed Under: DIY - Household, DIY Recipes Tagged With: how to remove baked on food from glass pan, How to remove baked on mess on glass pan, how to remove burned on food, How to remove burnt on food

Wood Conditioner – Great for Cutting Boards

September 30, 2015 By Recipe Renegade Leave a Comment

Share

Wood Conditioner Recipe Renegade


I love this conditioner for my wooden cutting boards – three simple ingredients and easy to make. Even though the rosemary essential oil is antibacterial, I never use my wooden boards for meats. I also don’t use wooden cutting boards that I’ve treated with this conditioner for anything I plan to ferment, like cabbage for sauerkraut. Rosemary Essential Oil is antibacterial and can impede the fermentation process by killing the good bacteria.

Wood Conditioner
 
Save Print
Author: Recipe Renegade
Ingredients
  • ½ Cup Walnut Oil
  • 2 Tablespoons Grated Beeswax
  • 15 Drops Améo Rosemary Essential Oil
Instructions
  1. In small stainless-steel pot, on low heat, warm walnut oil and beeswax until beeswax is melted.
  2. Remove from burner and add Améo rosemary essential oil.
  3. Pour into glass jar and let cool completely before using.
  4. With a soft cloth, rub a small amount into cutting board and let sit for 5 minutes.
  5. Polish with a second soft cloth.
3.5.3208

Looking for clinical-grade essential oils (essential oils that contain the same constituents as those used in clinical studies)? Please check out Ameo.com. Email me with any questions at lynn at makehealthierchoices dot com.

Share

Filed Under: DIY - Household, DIY Recipes Tagged With: cutting board conditioner, food safe wood conditioner, non-toxic wood conditioner, wood conditioner, wood preservative

Primary Sidebar

Search

My Metabolic Meals

Delicious and stress-free meals that are: 100% Gluten-free, and contain no artificial flavors, dyes, MSG, soy, wheat, rye, barley, malt, triticale, brewer’s yeast, low-grade proteins, and no processed vegetable oils (like canola, cottonseed, soybean, safflower). They also use grass-fed, grass-finished meats, and wild-caught seafood!!

Check out my Fullscript store!

Follow me on:

Please be advised:

Statements on this website have not been evaluated by the FDA and are NOT intended to diagnose, prescribe, treat, prevent or cure any disease, condition, illness, or injury. Please do not use any information on this website in place of a doctor. Please consult a doctor before making ANY dietary changes. This website is presented for entertainment purposes only.

AFFILIATE DISCLOSURE:

AFFILIATE DISCLOSURE: Throughout this website, you will find affiliate links. Any links you follow may or may not provide remuneration to help me support this website. Please note that any reviews will be honest reviews regardless of monetary compensation. Make Healthier Choices is a participant in the Amazon Services LLC Associates Program, an affiliate advertising program designed to provide a means for sites to earn advertising fees by advertising and linking to Amazon.com.

My Favorite Kitchen Appliance

I use this air fryer every day. I can not only air fry, I can bake, toast, defrost and much, much more.

Archives

  • May 2025
  • March 2025
  • January 2025
  • December 2022
  • October 2022
  • August 2022
  • March 2022
  • September 2021
  • May 2021
  • November 2020
  • January 2020
  • January 2018
  • March 2017
  • February 2017
  • August 2016
  • May 2016
  • April 2016
  • March 2016
  • February 2016
  • January 2016
  • December 2015
  • November 2015
  • October 2015
  • September 2015
  • August 2015
  • July 2015
  • June 2015
  • May 2015
  • Welcome
  • Recipes
  • About Lynn
  • Ingredients & Substitutions
  • Affiliate Disclosure
  • Articles

Copyright © 2025 · Make Healthier Choices · Log in