• Skip to primary navigation
  • Skip to main content
  • Skip to primary sidebar

Make Healthier Choices

Helping people Make Healthier Choices about real-food choices for optimal heath.

SEARCH

  • Home
  • Welcome
  • Free Body Scan
  • My Metabolic Meals
    • My Favorite Metabolic Meals
  • Recipes
    • Beverages
      • Audrey’s Pine Needle Tea
    • Bread
    • Candy
    • Desserts
    • DIY Recipes
      • DIY – Body
      • DIY – Household
      • DIY – Pets
      • Essential OIls
    • Fermented Foods
    • Free Recipes
    • Fruits
    • Main Dishes
      • Katherine’s White Chicken Chili
    • Meats
    • Pet Recipes
    • Salads
    • Sauces
    • Side Dishes
    • Snacks
    • Soup
      • Thai Soup – Immune-Building Soup
    • Spices
    • Vegetables
  • Recipes by Category
    • Gluten-Free
  • Blog
    • Articles
    • Ingredients & Substitutions
    • Reviews
  • About
    • Affiliate Disclosure
    • Contact me
    • Disclaimer
    • How I Overcame Sickness
  • The FUN Stuff
    • Sweepstakes
    • Take a Quiz
    • Free e-Books
  • Save on My Favorite Products
  • V Info

Archives for November 2015

Easy Way to Cook Winter Squash – No Peeler Required

November 23, 2015 By Recipe Renegade Leave a Comment

Share

Butternut Squash Recipe Renegade

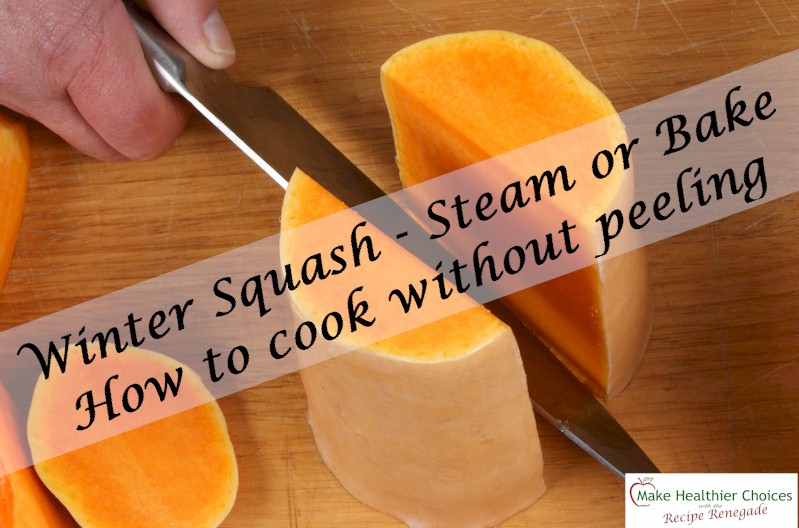
I can’t count how many times  peeled winter squash before cooking. It seems once I invested in an expensive, sharp vegetable peeler, I then realized peeling wasn’t necessary. Go figure. I like to cook several at a time and freeze in vacuum-seal bags. I make my own bags by using these rolls:

STEAMED:
Easy Way to Steam Winter Squash - No Peeler Required
 
Save Print
Steamed butternut squash
Author: Recipe Renegade
Ingredients
  • Butternut (or other winter squash) Squash
  • 2 Tablespoons Melted Butter
  • 2 Tablespoons Maple Syrup (+-)
  • ¼ Teaspoon Himalayan Salt (+/-)
Instructions
  1. Carefully and with a sharp chef knife, cut off both ends of squash.
  2. Stand squash up on one end.
  3. Cut in half (lengthwise).
  4. Seeds and pulp can be removed now or after cooking.
  5. Put on cutting board, cut side down, and cut into a couple smaller pieces.
  6. Put into steamer basket and steam for about 35 minutes or until squash is soft.
  7. Remove from steamer and place on cutting board to cool.
  8. If seeds were not removed before cooking, carefully remove them.
  9. Once squash has cooled (about ½ hour depending on thickness of squash), scoop squash out into a mixing bowl.
  10. Add butter, salt, and maple syrup.
  11. Use electric mixer to blend.
  12. Re-heat before serving.
3.5.3208

BAKED:
Easy Way to Bake Winter Squash - No Peeler Required
 
Save Print
Baked in Oven
Author: Recipe Renegade
Ingredients
  • 1 Butternut (or other winter squash) Squash
  • ¾ Cup Water
  • 2 Tablespoons Melted Butter
  • 2 Tablespoons Maple Syrup (+-)
  • ¼ Teaspoon Himalayan Salt (+/-)
Instructions
  1. Carefully and with a sharp chef knife, cut off both ends of squash.
  2. Stand squash up on one end.
  3. Cut in half (lengthwise).
  4. Seeds and pulp can be removed now or after cooking.
  5. Place on jelly pan, skin side up.
  6. Add water to pan.
  7. Bake at 400° F for about 35 minutes or until squash is soft.
  8. Remove and place on cutting board or cooling rack to cool.
  9. If seeds were not removed before cooking, carefully remove them.
  10. Once squash has cooled (about ½ hour depending on thickness of squash), scoop squash out into a mixing bowl.
  11. Add butter, salt, and maple syrup.
  12. Use electric mixer to blend.
  13. Re-heat before serving.
3.5.3208

Share

Filed Under: Fruits, Gluten-Free, Recipes, Side Dishes, Vegetables Tagged With: Easy way to cook butternut squash, how to cook squash, how to cook winter squash

Gluten-Free Green Bean Casserole

November 20, 2015 By Recipe Renegade 2 Comments

Share

This is a great, healthy replacement for traditional green bean casserole that contains unknown or scary ingredients like monosodium glutamate (MSG). AND it’s not only gluten free, it’s delicious! The instructions look long, but it’s easy to make. (Scroll down for do-ahead tip and substitutions if you aren’t worried about gluten-free.) As always, if making the gluten-free version, make certain all ingredients are, in fact, gluten free.

This recipe cooks up fast – your sauce should be finished before onion rings are done baking. Be sure to gather your ingredients before starting. Scroll down for video.

Gluten-free Green Bean Casserole Recipe Renegade


Gluten-Free Green Bean Casserole
 
Save Print
Delicious, healthy, green bean casserole! Even your family won't know it's gluten-free!!!
Author: Recipe Renegade
Ingredients
  • FOR THE TOPPING:
  • 2 medium Onions, sliced
  • ¼ to ½ Cup Pamela's Baking and Pancake Mix
  • 1 Teaspoon Himalayan or Celtic Salt
  • 1 Small Egg
  • 3 Tablespoons Water
  • FOR THE PAN:
  • 2 Teaspoons Coconut Oil
  • FOR THE CREAM OF MUSHROOM SOUP:
  • 1 pound frozen or fresh, French-style Green Beans
  • 2 tablespoons Butter
  • 12 ounces fresh Mushrooms
  • ½ teaspoon freshly ground Black Pepper
  • 1 teaspoon Himalayan or Celtic Salt
  • ½ teaspoon Onion Powder
  • 2 minced Garlic Cloves (about 1 ½ teaspoon)
  • 1 cup Chicken Broth (bone broth)
  • ½ cup Milk
  • ½ cup Light Cream
  • ¼ cup Arrowroot Powder
Instructions
  1. MAKE THE ONION RINGS:
  2. Preheat the oven to: 475° F.
  3. Gather ingredients.
  4. Remove green beans from freezer. Place in strainer and rinse with cold water for a few minutes. Set aside to drain and continue thawing.
  5. Coat a sheet pan with coconut oil.
  6. Mix Pamela's Baking and Pancake Mix and Himalayan Salt in a large mixing bowl.
  7. In another bowl, scramble egg with water.
  8. Toss sliced onion rings in egg/water mixture.
  9. Toss onions in bowl with Pamela’s Baking and Pancake Mix and Himalayan Salt to coat.
  10. Spread onions onto jelly pan.
  11. Bake at 475° F for 30 to 35 minutes, flipping every 10 minutes. Onions should be slightly brown when done.
  12. Change oven temperature to 400° F when onions are finished. (Or shut off oven if making casserole for the next day - see "DO-AHEAD TIP below.")
  13. WHILE ONIONS ARE BAKING, MAKE CREAM OF MUSHROOM SOUP:
  14. Chop mushrooms into tiny pieces.
  15. Over medium heat in a 12-inch *skillet, add butter, mushrooms, salt, pepper, and onion powder.
  16. Cook over medium heat for about 5 minutes or until mushrooms start to turn slightly brown.
  17. Add fresh garlic and cook for additional minute.
  18. Add chicken broth, milk and cream.
  19. Sprinkle arrowroot powder on top using a metal strainer and quickly stir in. (Mixture will thicken quite fast and you don't want it to lump.)
  20. Remove from heat and stir in ¼ of the baked onions and all of the green beans.
  21. Top with the remaining onions.
  22. Bake at 400° for 15 minutes or until bubbly. Serve immediately.
Notes
*If using cast-iron skillet for cooking mushroom sauce, casserole can be baked in the same skillet.

DO-AHEAD TIP: Once cooled (about 20 to 30 minutes), refrigerate. Cook at 350° F for 30 minutes.
3.3.3077

Do-ahead Tip: Make casserole the day before and once cooled, refrigerate. When ready to eat, bake at 350° for 30 minutes or until bubbly.

Substitutions: FOR CASSEROLE THAT IS NOT GLUTEN-FREE – 2 tablespoons all-purpose flour can be substituted for the arrowroot powder in the soup and 1/4 to 1/2 cup all-purpose flour can be substituted for the Pamela’s Baking and Pancake Mix for the onion rings. (Honestly, I think the onion rings are crispier and taste MUCH better using the Pamela’s Baking and Pancake Mix.)

Whole milk can be substituted for the milk and cream.

Share

Filed Under: Gluten-Free, Recipes, Side Dishes

Why I Don’t Wash Fruits/Vegetables in my Sink

November 19, 2015 By Recipe Renegade 1 Comment

Share

There is a disturbing photo, similar to the one below (except there’s no additional bowl in the sink), I’ve seen numerous times being circulated on social media. It promotes washing fruits and vegetables in the kitchen sink with vinegar. I personally find it disturbing — for two reasons:

Sink Traps

1. Sink traps – Under all properly installed sinks is a trap. The trap’s purpose is to hold water in the u-shaped area thereby sealing off methane gasses that would otherwise find their way back into our homes. This drain is not only attached to the same pipe that toilets flush into, it makes a great breeding ground for bacteria — bacteria that can potentially find its way back up into the sink. The only way I know to be certain of no bacteria in the trap, is to disinfect it with bleach. Those of us with septic systems usually avoid bleach like the plague. Even then, I’m not so sure I would trust it to be completely germ-free.

I think a better choice for washing fruits and vegetables, is to use a large bowl in the sink or dedicate a dishpan solely for washing fruits and vegetables.

23067993_s

Image credit: joey333 / 123RF Stock Photo

Genetically Modified Organisms (GMOs)

2. White vinegar – sure white vinegar wasn’t invented to be eaten, it was invented to be used as a cleaning disinfectant, but I’m not sure it’s suitable for disinfecting food. As far as I know, it is made from Genetically modified (GMO) corn that no longer needs to be sprayed with pesticides. BT Corn that is regulated by the Environmental Protection Agency because it was engineered to have insecticide on the INSIDE. Is vinegar a good choice for washing fruits and vegetables? I don’t think so for a couple reasons. I don’t think it makes sense to buy organic, GMO-free foods and wash them with made-from-GMO-grain white vinegar. I do purchase white vinegar for cleaning my coffee pot, setting colors into dark clothes, and sometimes use it to clean my refrigerator. Every time I use it, however, it doesn’t feel right–I feel I’m promoting GMOs. The more often we buy GMOs, the more often they’re manufactured and the bigger the risk of non-GMO foods becoming contaminated.

My favorite fruit/vegetable wash is making my own with soap and Améo essential oils. If you don’t want to make your own, I used Veggie Wash for years and have used Tropical Traditions’ All-Purpose Everyday Cleaner and diluted it roughly 50 to 1.


Bacteria

I think most of us realize that pesticides are systemically consumed by the fruit and vegetables, thereby making it impossible to wash them off. I have no idea if the chemicals, that are sprayed on after harvest to keep them fresh, can be washed off. I’ve been able to finally switch most of my fruits and vegetables to organic. Wouldn’t it be great if everyone switched to organic? Wouldn’t we then only see organic in our supermarkets?

I think it’s useless to wash fruits and vegetables with the intent of removing pesticides. I do think it’s imperative to wash them, if I don’t know and trust my local farmer, to hopefully remove bacteria — listeria, e. coli, etc. Bacteria from CAFOs (Concentrated Animal Feeding Operations, also known as farm factories) is known to run into fields of fruits and veggies – organic or not. If the CAFO is located ‘upstream’ of a field of spinach (or any fruit or vegetable that grows on the ground), it’s almost guaranteed to be contaminated with bacteria.

I also wonder: How many people handled my fruits/vegetables? How many did not wash their hands after using the bathroom? How many sick people handled my fruits/vegetables? I never want to say, “my family member/friend wouldn’t have been so sick (or worse) if I’d washed my vegetables.”

Can I guarantee using a veggie wash or a few drops of essential oil with a few drops of soap will properly disinfect the bacteria from my food? Probably not. I will, however, sleep better at night knowing I at least tried.

Share

Filed Under: Articles, Blog Tagged With: do not use white vinegar to wash fruits and vegetables, essential oils to wash vegetables, how to wash fruits and vegetables, how to wash vegetables

Kombucha Misinformation

November 5, 2015 By Recipe Renegade 2 Comments

Share

Sometimes it’s hard to differentiate between fact and fiction on the Internet. Especially when it comes to Kombucha. Kombucha myths are easy to find.

“I don’t drink Kombucha because of the sugar.”

A properly fermented, home-made Kombucha will have little to no sugar. I don’t like to ferment mine so long that there’s no sugar left. At some point I’ll purchase a test kit to know how much sugar is in my kombucha. Be careful of commercial brands that add sugar after fermenting. If you can’t stand the taste of no-sugar-added Kombucha, it’s not a bad idea to start out with one with sugar added to get used to drinking it. You can always graduate slowly to one without the sugar. Not everyone will want to drink something as tart as Kombucha. 

Glass of Kombucha Flowers with words Recipe Renegade

“There are no probiotics in Kombucha.”

Probiotics are live organisms, such as yeasts and bacteria, that promote life. “Pro” means “for” and “biotic” means “life,” so probiotic means “for life.” Kombucha can’t be made without a SCOBY, which stands for Symbiotic Colony of Bacteria and Yeast. A SCOBY is also known as a “mother,” “mushroom,” or “pancake.” To see if your store-bought Kombucha contains live cultures, try to grow your own SCOBY by putting some in a glass and leaving it on your counter for a week or so. You’ll see a film start to grow if it is alive.  Populating our guts with good yeasts and good bacteria promotes life.

A consensus definition of the term “probiotics,” based on the available information and scientific evidence, was adopted after a joint Food and Agricultural Organization of the United Nations and World Health Organization expert consultation. In October 2001, this expert consultation defined probiotics as: “live micro-organisms which, when administered in adequate amounts, confer a health benefit on the host.”

 “Kombucha isn’t good for us because tea contains lots of fluoride, so Kombucha has lots of fluoride in it”

Use organic tea and clean, un-fluoridated water to reduce fluoride. A small amount of naturally-occurring fluoride from the tea shouldn’t be an issue. There’s a big difference between a small amount of naturally-occurring fluoride and large amounts of man-made fluoride. Man-made fluoride is a byproduct of the fertilizer and aluminum industries.
It’s essential to always use clean water that does not contain fluoride, chlorine, or any other toxins, when making our own kombucha. Common sense tells us that we really shouldn’t be fermenting toxins.

Cultures for Health is one of my favorite places to buy fermenting supplies. You can find them HERE. Check out their article that puts some Kombucha myths to rest: Busting Kombucha Myths.

Share

Filed Under: Articles, Beverages, Blog, Fermented Foods, Recipes Tagged With: does kombucha have sugar? does kombucha have probiotics? what are probiotics, kombucha

Primary Sidebar

Search

Click for more information.

Follow me on:

Please be advised:

Statements on this website have not been evaluated by the FDA and are NOT intended to diagnose, prescribe, treat, prevent or cure any disease, condition, illness, or injury. Please do not use any information on this website in place of a doctor. Please consult a doctor before making ANY dietary changes.

AFFILIATE DISCLOSURE:

AFFILIATE DISCLOSURE: Throughout this website, you will find affiliate links. Any links you click on may or may not provide remuneration to help me support this website. Please note that any reviews will be honest reviews regardless of monetary compensation. Make Healthier Choices is a participant in the Amazon Services LLC Associates Program, an affiliate advertising program designed to provide a means for sites to earn advertising fees by advertising and linking to Amazon.com. Please be advised that Lynn McGovern, d/b/a Make Healthier Choices, is an Independent Zija International Distributor which includes Améo Essential Oils and Ripstix Supplements.

My Favorite Kitchen Appliance

I use this air fryer every day. I can not only air fry, I can bake, toast, defrost and much, much more.

Archives

  • March 2025
  • January 2025
  • December 2022
  • October 2022
  • August 2022
  • March 2022
  • September 2021
  • May 2021
  • November 2020
  • January 2020
  • January 2018
  • March 2017
  • February 2017
  • August 2016
  • May 2016
  • April 2016
  • March 2016
  • February 2016
  • January 2016
  • December 2015
  • November 2015
  • October 2015
  • September 2015
  • August 2015
  • July 2015
  • June 2015
  • May 2015
  • Welcome
  • Recipes
  • About Lynn
  • Ingredients & Substitutions
  • Affiliate Disclosure
  • Articles

Copyright © 2025 · Make Healthier Choices · Log in